1. Park combine on a level surface. Ensure that the
combine feederhouse is level.
2. Adjust header so cutterbar is 6-10 inches (150–254 mm)
off the ground.
3. Set guard angle to mid-position (between B and C on the
indicator).
4. Set the reel fore-aft to mid-position (5 or 6 on reel arm
decal).
5. Lower reel completely. Shut down the combine.
6. Place wing lock spring handles in the locked position.
7. Place header float locks in unlocked (lowered) position.
8. If equipped, set stabilizer/transport wheels to the fully
raised position.
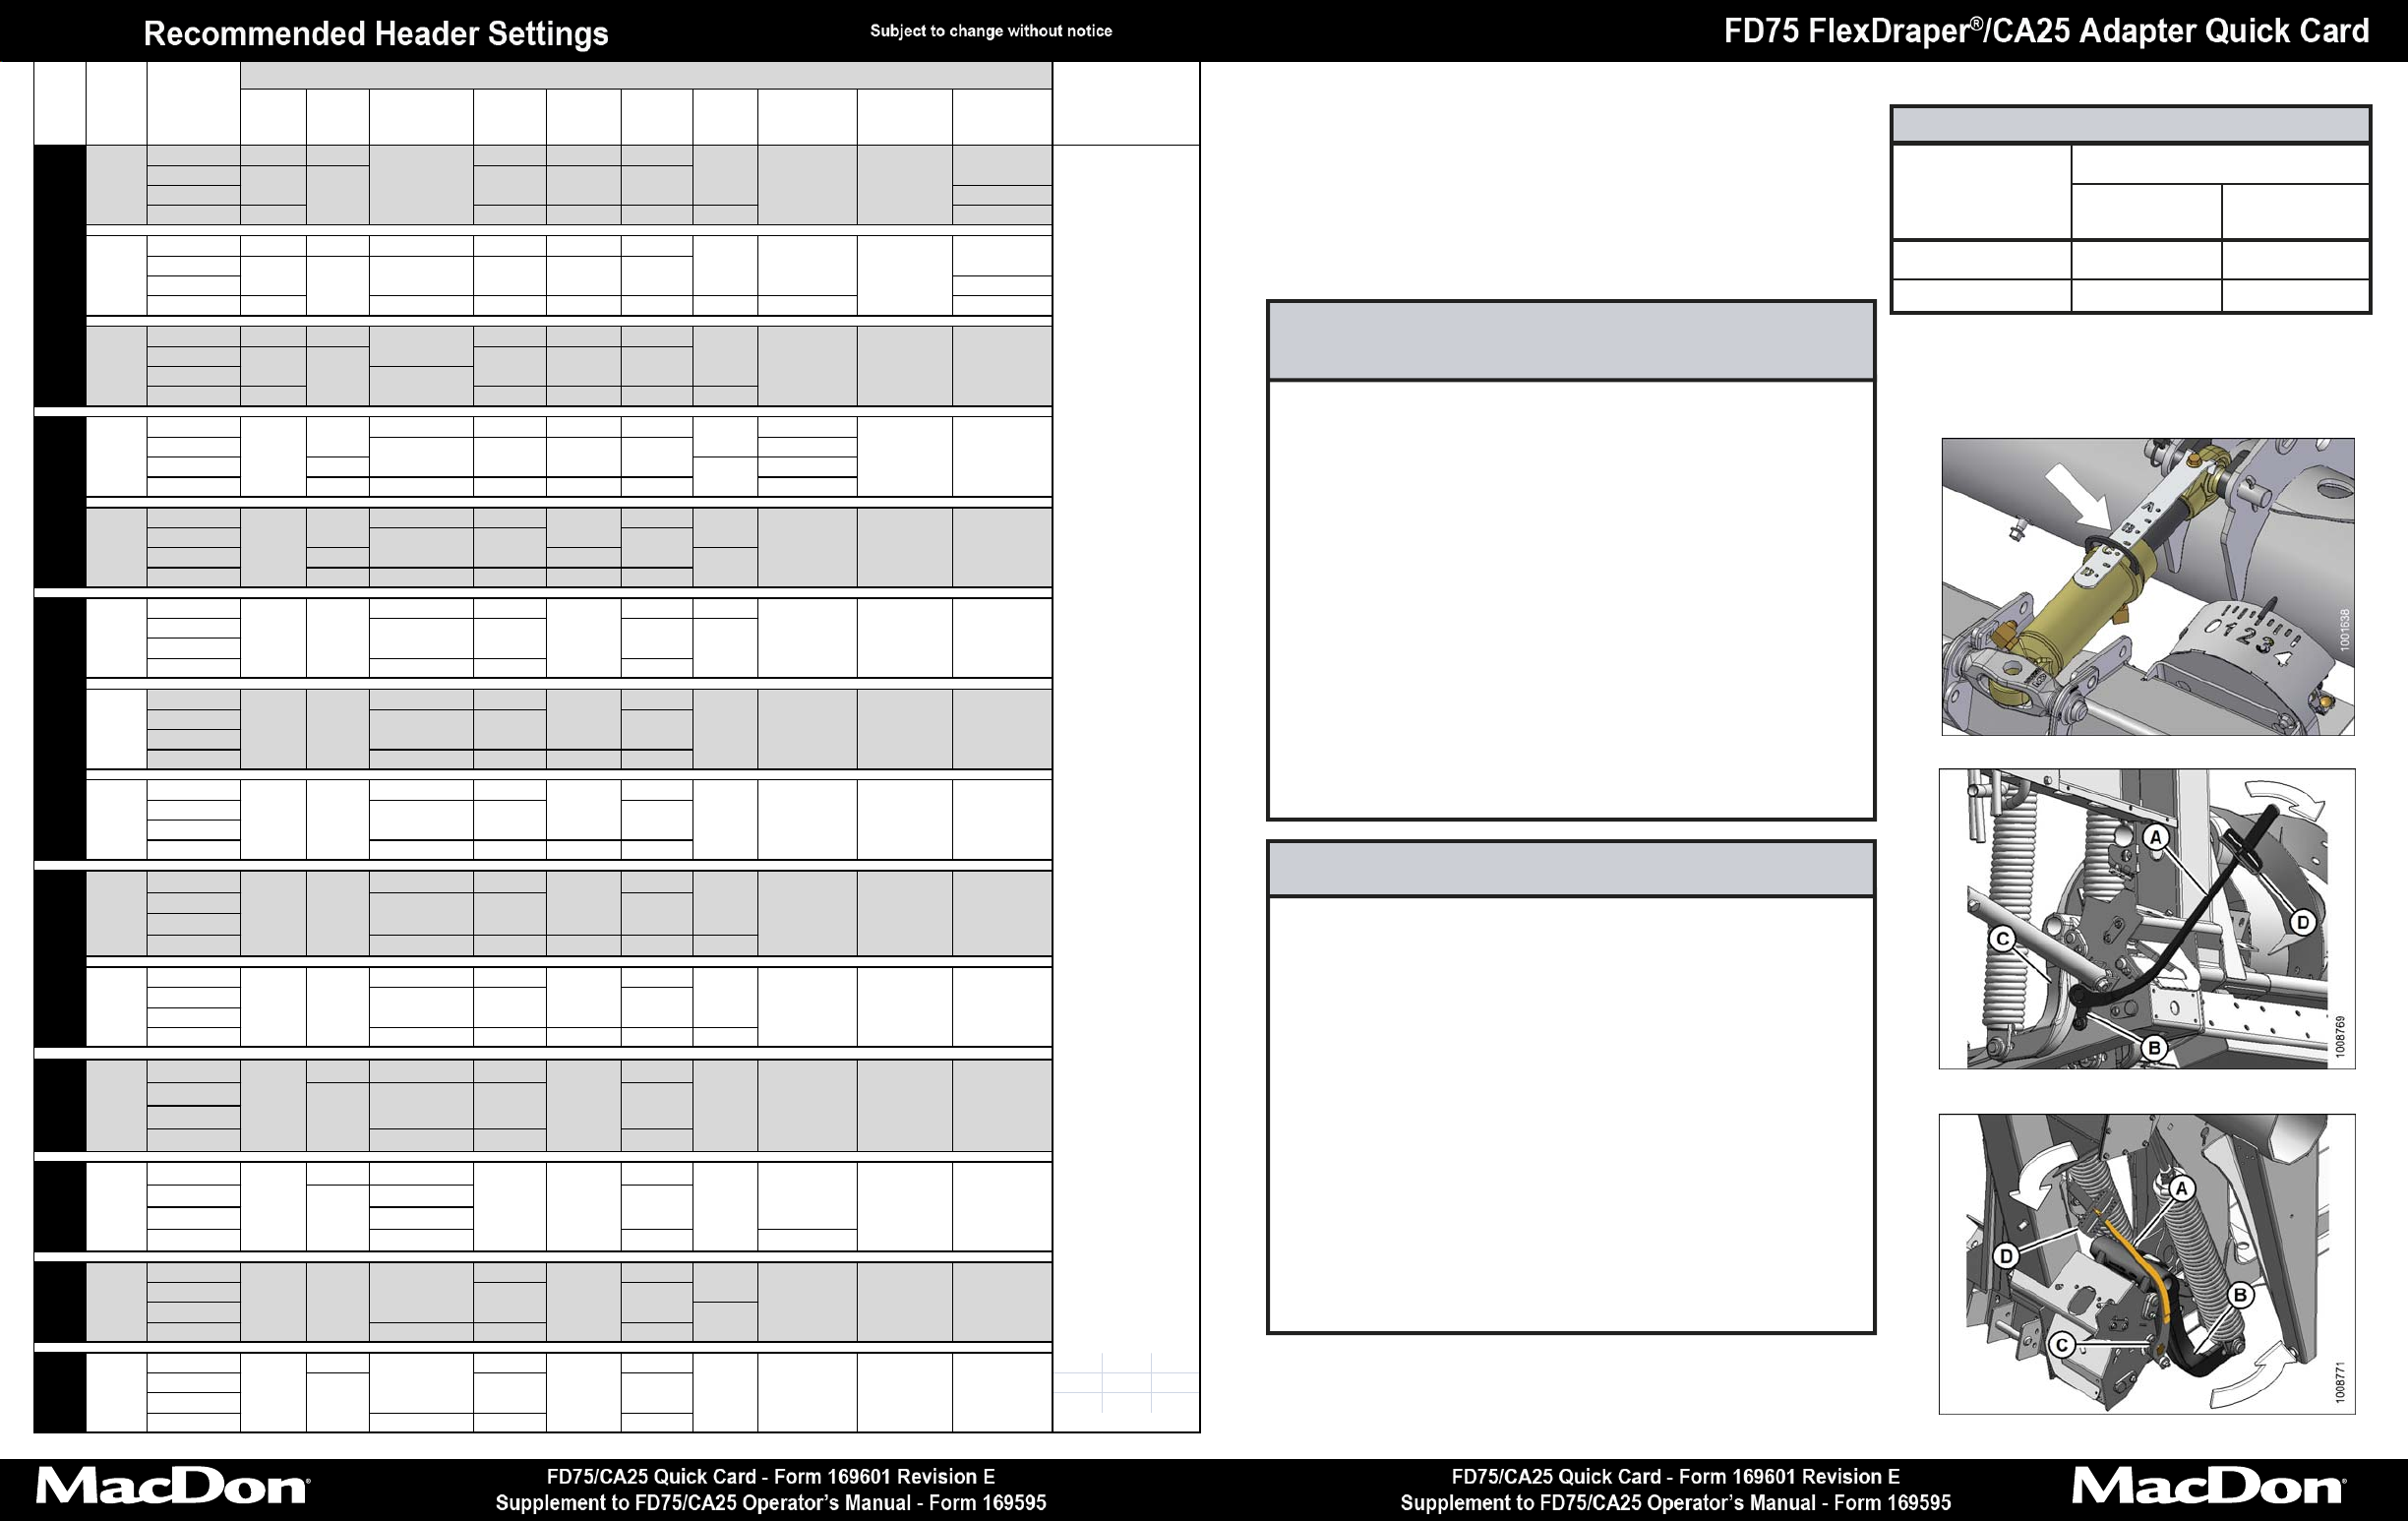
STEP 1: PRE-ADJUSTMENTS
Complete before adjusting float or wing balance.
1. Remove the special torque wrench (A) from storage
position on right side of the CA25 combine adapter.
2. Place torque wrench (A) on the float lock at (B). Note
change in orientation of wrench between left and right
side.
3. Push down on torque wrench (A) until bell crank (C)
rotates forward.
4. Continue pushing down until indicator (D) on wrench
reaches a MAXIMUM reading and begins to decrease.
Note the maximum reading.
5. Repeat above steps for opposite side.
6. The readings should match the values in TABLE 1.
HEADER FLOAT.
STEP 2: CHECK HEADER FLOAT
THESE ARE THE 5 STEPS TO SET
HEADER FLOAT AND WING BALANCE
IMPORTANT
Be sure to have read your operator’s
manual, and complete all set-up tasks
before setting header float and wing
Header Width
Torque Settings
Cutting on
the Ground
Cutting off
the Ground
30 and 35 ft. 1-1/2 to 2 2 to 2-1/2
40 and 45 ft. 2 to 2-1/2 2-1/2 to 3
TABLE 1. HEADER FLOAT
IMPORTANT
The torque settings in the above table are
recommended header float settings. Crop
and field conditions may require adjusting
the float to values outside these guidelines.
Divider
Rods
Draper
Speed
(Note 7)
Header Angle
(Notes 1 and 4)
Knife
Speed
(Note 2)
ReelCam
Setting
Reel
Speed %
(Note 3)
Reel
Position
Skid Shoe
Position
(Note 4)
Stabilizer
Wheels
(Notes 4 and 5)
Upper Cross
Auger
Light
Off 8 600–650 3 10–15
Normal
Heavy
Recommended
Lodged
Off 525–600 3 or 4 5–10 4 or 5 Not Required
Light
Off 8 B - C 600–650 4 10–15
Normal
Heavy
Recommended
Lodged
Off D 525–600 3 or 4 5–10 4 or 5 Down Not Required
Light
Off 8 600–650 4 10–15
Normal
Heavy
Lodged
Off 525–600 3 or 4 5–10 4 or 5
Light
A 600–650 2 5–10 Down
Normal
Center or Down
Heavy
8 Down
Lodged
7 D 525–600 2 5–10 Center or Down
Light
A 600–650 5–10
Normal
Heavy
81 or 2
Lodged
7 D 525–600 2 or 3 5–10
Light
D 600–650 10–15 6 or 7
Normal
Heavy
Lodged
D 525–600 5–10
Light
D 600–650 10–15
Normal
Heavy
Lodged
D 525–600 4 5–10
Light
A 600–650 10–15
Normal
Heavy
Lodged
D 525–600 4 5–10
Light
D 600–650 10–15
Normal
Heavy
Lodged
D 525–600 3 or 4 5–10 4 or 5
Light
A 600–650 10–15
Normal
Heavy
Lodged
D 525–600 3 or 4 5–10 4 or 5
Light
8 D 600–650 5–10
Normal
Heavy
Lodged
D 525–600 5–10
Light
8B - C 5–10
Normal
A
Heavy
B - C
Lodged
D5–10Down
Light
600–650 5–10
Normal
Heavy
Lodged
D 525–600 5–10
Light
8 600–650 5–10
Normal
Heavy
Lodged
D 525–600 5–10
Up or Center Storage
On 2
3 or 4
6 or 7
550–600
7
Note 5
10
B - C
6 or 7
B - C
A
550–600
B - C
B - C
2 or 3
2
550–600
10
B - C
550–600B - C
550–600B - C
10
10
10
6 or 7
3 or 4
2
550–600
7
B - C
B - C
2
4 or 5
7
2
10
3
6 or 7
3
B - C 550–600
B - C 550–600
B - C 101
10
Note 5 Not Required
4 or 5
Not RequiredStorageUp or Center6 or 7
6 or 7
Center or Down
10
StorageUp or Center
6 or 7
6 or 7
7
26 or 7
6 or 7
550–600 10
10
2
7
2 or 3 6 or 7
Off
On
On
On
On
7
600–650
7
7
Not Required
CerealsCanola
4–8
4–8
10 +
0
–
3
RecommendedNote 5Not ApplicableOn
On Recommended
Note 5
Center or Down
Not RequiredNot Applicable
Not Required
10
6 or 7
A 550–600On
Not Applicable Note 5
550–600
Peas
0–3
Flax
6
610
RecommendedStorageUp or Center
Not Applicable
Not Required
102
Soybeans Delta rice California rice
0
–
3
4–8
Rice
Divider
Rod
(Note 6)
Rice
Divider
Rod
(Note 6)
Lentils
0–3
0–3
2–6
Note 5
Stubble
Height
(in.)
Crop
Condition
8 +
2–6
10 +
10 +
Notes
550–600
7
On
Not Required
Crop
Type
4
4
4
Rice
Divider
Rod
(Note 6)
Off
550–600
Not RequiredNote 5Center or Down
6 or 7
Note 4:
OPERATING VARIABLES
Note 6:
Note 7:
Available through
your Dealer. Rice
Divider Rod not
required on both
ends of header.
Setting on CA25
draper control.
Cutting height is
controlled with a
combination of skid
shoes and header
angle.
Note 1:
Note 2:
Note 3:
Percentage above
ground speed.
Note 5:
Stabilizer wheels
are used to limit the
side to side
movement when
cutting off the
ground in rolling
terrain, and to
minimize bouncing.
Minimum knife drive
pulley rpm.
Applicable only to
single-knife
headers.
Set header angle
as shallow as
possible (setting A)
with center-link and
skid shoes while
maintaining cutting
height.
2
Note 5 Not Required
Not RequiredNote 5Center or Down
Up or Center Storage Not Required
LEFT SIDE
RIGHT SIDE
 (215 pages)
 (448 pages)
 (204 pages)
 Manymanuals.com
 Manymanuals.de
 Manymanuals.fr
 Manymanuals.it
 Manymanuals.pl
 Manymanuals.cz
 Manymanuals.es
 Manymanuals-pt.com
Comments to this Manuals